1.e4
c5
2.Nf3
e6
3.d4
cxd4
4.Nxd4
Nc6
5.Nc3
The game Richard Jones-Dobrov from Round 2 had gone 5.Nb5 d6 6.Bf4 Ne5 7.Bxe5 dxe5 8.Qxd8+ Kxd8 and White went on to lose because of his weak dark squares.
Needless to say I wasn't having anything to do
with that
5...Qc7
6.g3
This is only the third time I've played the 6 g3 line against the Taimanov Sicilian.
I had an excellent win against the dogged Michael Boyce of Thornbury in 2000 but lost against the evergreen Jim Sherwin at Yeovil last year.
[Many people will know of the famous Fischer-Tal game at Bled in 1961 where Tal played the careless 6...Nf6 7.Ndb5 Qb8 8.Bf4 Ne5 9.Be2 Bc5 10.Bxe5 Qxe5 11.f4 Qb8 12.e5
With a huge bind. Fischer clinched his first win over Tal after prolonged resistance:
12...a6 13.exf6 axb5 14.fxg7 Rg8 15.Ne4 Be7 16.Qd4 Ra4 17.Nf6+ Bxf6 18.Qxf6 Qc7 19.0-0-0 Rxa2 20.Kb1 Ra6 21.Bxb5 Rb6 22.Bd3 e5 23.fxe5 Rxf6 24.exf6 Qc5 25.Bxh7 Qg5 26.Bxg8 Qxf6 27.Rhf1 Qxg7 28.Bxf7+ Kd8 29.Be6 Qh6
(As Irving Chernev pointed out this game is also remarkable for the statistic that Tal's two remaining Pawns do nothing except hem in his Bishop. Fischer promptly does something about that too.)
30.Bxd7 Bxd7 31.Rf7 Qxh2 32.Rdxd7+ Ke8 33.Rde7+ Kd8 34.Rd7+ Kc8 35.Rc7+ Kd8 36.Rfd7+ Ke8 37.Rd1 b5 38.Rb7 Qh5 39.g4 Qh3 40.g5 Qf3 41.Re1+ Kf8 42.Rxb5 Kg7 43.Rb6 Qg3 44.Rd1 Qc7 45.Rdd6 Qc8 46.b3 Kh7 47.Ra6 Fischer - Tal 1-0 1961
After the text I'm certain that if I'd played 7 Ndb5 Qb8; 8 Bf4 then 8...Ne5 would have happened. Again I had no interest.
This takes the game away from Taimanov lines back towards the Scheveningen, a variation that I have much more experience with as both White and Black. I drew a Scheveningen as Black against GM James Plaskett at the Clevedon Spectrum Tournament a few years ago. That game ultimately cost Plaskett the Leigh Grand Prix because he needed a clean 5/5 to enhance his chances. The possibility of transpositions had been mentioned in Graham's book and I quite happy with that!
8.0-0
a6
9.Be3
Ne5
Persistent. The steed wants to come to c4 to molest the Bishop and Pawn b2. It took me a few moments to realise what the counter to this was, but I think Black should probably be consistent and play 10
..Nc4.
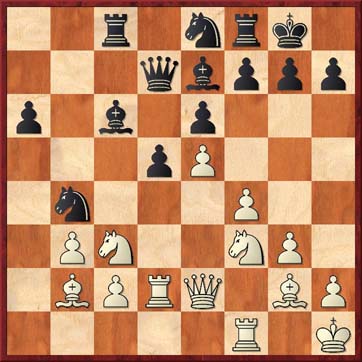
10.Qe2
Nf6
11.Rad1
Nc4N
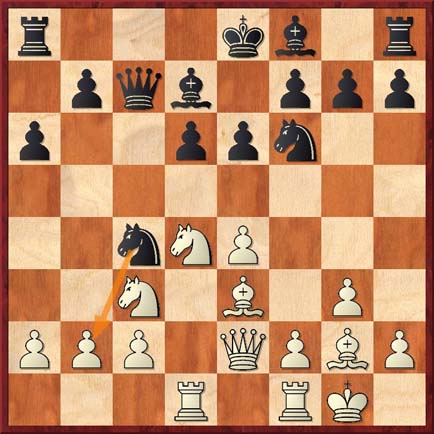
To my mind this is a move too late. White had had time to develop his Queen's Rook so now I was happy to retreat the Bishop and redevelop it via b2. I recall Judit Polgar doing this many years ago and winning with a ferocious Kingside attack.
12.Bc1
Rc8
13.b3
Ne5
My computer mentions 13...Qa5
but 14.Qe1
is an adequate response. If this had actually happened on the board I would have been greatly encouraged. The only other time I've had a WQe1/WNc3/BQa5 motif was against Keith Arkell at Paignton in 1987 and Nxd5 proved to be a winning sacrifice. These little points can sometimes be significant omens.
As it was I was already reasonably happy. My opponent was playing slowly, my position was okay and my score against GMs this century was 21/2/4. I even had a clear plan in mind for the middle game, if I had the nerve to pursue it!]
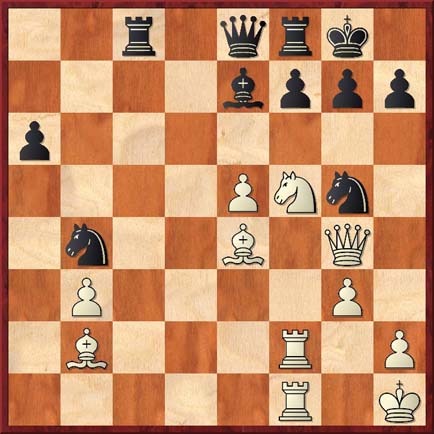
14.Bb2
Be7
An obvious alternative is 14...b5
I had visions of lines like b4; Nd5 exd5; exd5+ (Black's Knight on e5 had moved
on by then) Be7; Rfe1 with an attack, until I noticed that Black calmly castles
and after Qxe7 wins the lady with R (either) e8. A failed tactic, but note that
the Bishop on d7 interrupts the defence of the Bishop on e7. Next I noticed that
in some lines the d7 Bishop is itself a tactical liability. At this point I
reasoned that if Black played b7-b5 to threaten /\b5-b4 then I wanted the c3
Knight to go to e4. This means I have had to play f2-f4 and e4-e5. Where is the
Knight on f6 going? It can't go to d7 so it looks like e8. That means if Black
starts thinking about taking on e5 he can't do it while his Queen has to defend
the loose Bishop on d7. All further encouragement.
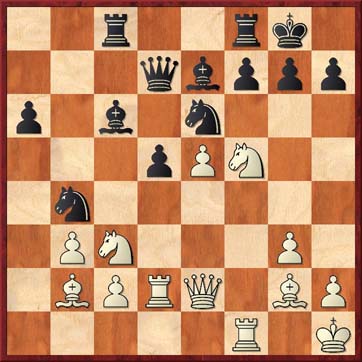
15.f4
Nc6
16.Nf3!
White has a space advantage and correctly avoids exchanges. This does mean that the Black Knight on f6 has the g4 square available after the e4-e5 push, but it may not be too significant because of the aforementioned tactic.
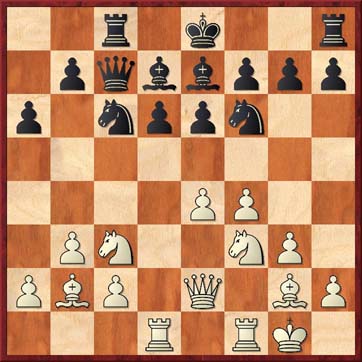
16...0-0
17.Kh1
A typical precautionary move avoiding checks on the g1-a7 diagonal. The value of this move is often questioned. I would suggest that it's a useful exercise in any game to look out for positions where the difference between having the King on g1 (g8) or h1 (h8) is of significance in tactical sequences.
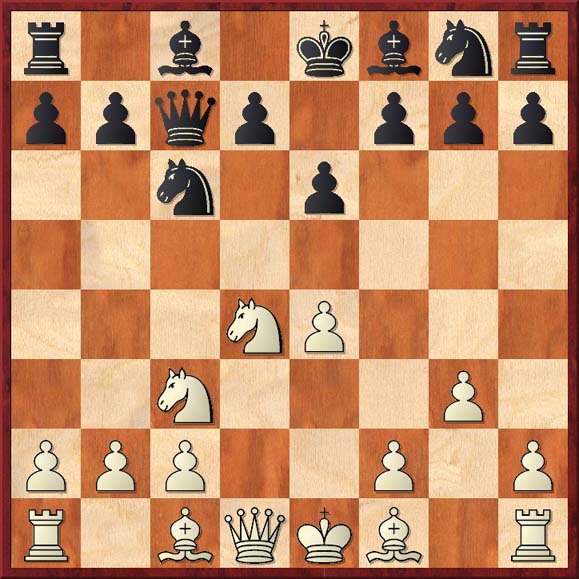
My guess would be that the corner square is probably safer, but then I was recently looking at the folowing game:
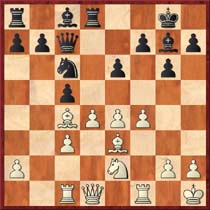
Geller-Smyslov from their 1965 Candidates match.
1.d4 Nf6 2.c4 g6 3.Nc3 d5 4.cxd5 Nxd5 5.e4 Nxc3 6.bxc3 Bg7 7.Bc4 c5 8.Ne2 O-O 9.O-O Nc6 10.Be3 Qc7 11.Rc1 Rd8 12.f4 e6 13.Kh1 ( Diagram 1)
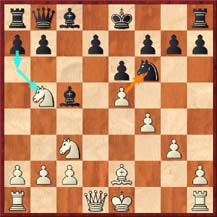
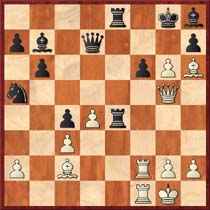
b6 14.f5 Na5 15.Bd3 exf5 16.exf5 Bb7 17.Qd2 Re8 18.Ng3 Qc6 19.Rf2 Rad8 20.Bh6 Bh8 21.Qf4 Rd7 22.Ne4 c4 23.Bc2 Rde7 24.Rcf1 Rxe4 25.fxg6 f6 26.Qg5 Qd7 27.Kg1! Bg7 28.Rxf6 Rg4 29.gxh7+ Kh8 30.Bxg7+ Qxg7 31.Qxg4 1-0.
It was Geller's calm 27 Kg1 ( Diagram 2 ) that ruled out back rank mates and enabled his brilliant attack to succeed.
Returning to my game -
Black's next move is an attempt to generate counterplay on the Queenside, but he may be better off playing Rfd8.
17...b5
[17...Rfd8
]
18.e5!
Firmly taking the initiative. Clearly Black can force White to have an isolated Pawn by exchanging but is it a strength or a weakness?
18...Ne8?!
An incredible decision, and one that cost Dobrov a lot of time on the clock. [First of all Black can't play 18...Ng4
because it loses a piece after 19.exd6
Bxd6
20.Qd3
. If Black wants to go Ng4 he must exchange on e5 first. ; 18...dxe5
19.fxe5
Ng4
20.Ne4
we reach the position I saw earlier where multiple captures on e5 lose the Bishop on d7. Notice that White's Bishop on b2 is now playing a major role. Knight hops into d6 or f6 are viable with the support of the dark-squared prelate. Certainly 20...Rcd8
21.Nd6
must be a critical line.
Black can also consider exchanging on e5 and then playing Ne8 but that is inconsistent. At least by playing Ne8 first Black retains the option of exchanging on e5 or playing .d6-d5. Nevertheless, to see this retreat instead of the sharp 18...dxe5; 19 fxe5 Ng4 from a GM was a considerable morale boost.
] I took a lot of time over the next move.
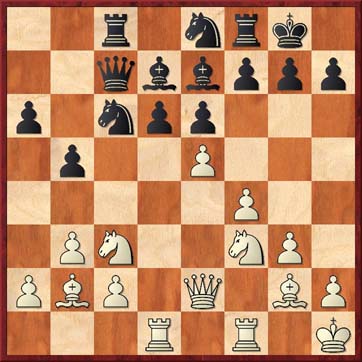
19.a3
[The obvious 19.Ne4
didn't seem to lead anywhere after 19...d5
20.Neg5
(20.Nf2
Nb4
) 20...h6
so I decided to rule out the /\b4 push. If Black persisted of playing /\b4 to establish his Knight on this square then the a6 Pawn would be exposed on the f1-a6 diagonal, and the open a-file may be of use to White. Admittedly Black has possible threats of Bb5 and play against c2 but against careful play these should come to nothing. ]
19...b4
20.axb4
Nxb4
21.Rd2!

A flexible move that gives added support to the c2 Pawn and prepares for the doubling of Rooks on either the d or f files. Of course Ra1 with both the Rooks operating on open files is possible.
21...Bc6
22.Ne4!?
Astonishingly my computer claims that this is a mistake. This is because of the line 22....Bxe4
22...d5?
An even more astonishing reply. Black relinquishes any pressure he has on White's spearhead e5 Pawn, blocks the diagonal of the Bishop he has just placed on c6, and basically gives White a free hand on the Kingside. I don't disagree with my computer about 22...Bxe4; 23 Qxe4 d5 being a better continuation, just with the unnecessary follow-up Queen sacrifice.
Because Black now threatens 23 ....Bb5, which was met by 23 c4 if played on move 22, White must lose two tempi by putting his Knight back on c3. However, my morale had shot up, I fully realised that my opponent was playing both slowly and badly and I knew I had a real chance of a Kingside attack. Obviously this far outweighs two tempi! [22...Bxe4
23.Qxe4
d5
24.Qe2
Qxc2!?
Eventually it claims White emerges with an advantage after (Now clearly Black can't play 24...Nxc2?
here because of 25.Rc1+/-
) 25.Rxc2
Rxc2
26.Qe3
Rxb2
27.Rc1
Perhaps it should get out more often.; 22...Bb5?
23.c4!
]
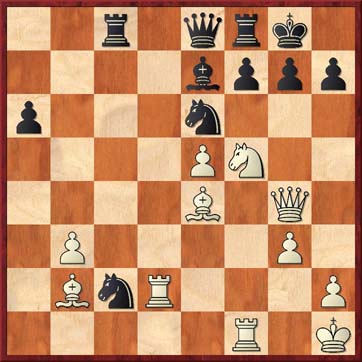
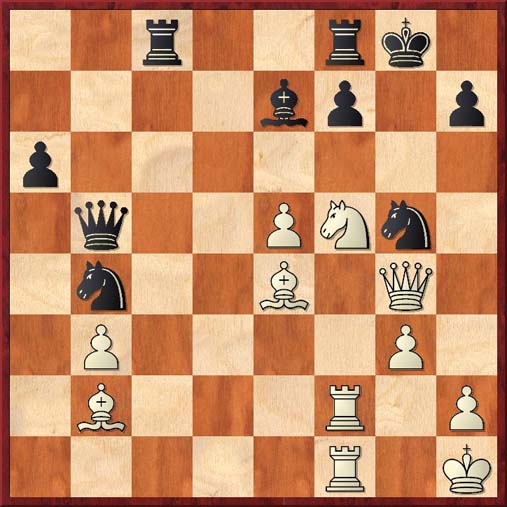
23.Nc3
Qd7?!
I found this move to be incomprehensible. Clearly putting the Queen opposite an enemy Rook is something the textbooks advise against, and b6 or b7 must be more natural squares. Black is trying to regroup to meet the oncoming attack, but is doing so in a very clumsy fashion. Perhaps he hopes to play f5 now that he has defended his Pawn on e6 against capture by the White Queen after exf6 e.p., but there is no time.
24.Nd4
Nc7
[If 24...g6
25.g4
Ng7
26.f5!
and White's initiative continues unabated. Black consistently refuses to move any of his Kingside Pawns which is in keeping with basic defensive technique, but I think even Wilhelm Steinitz would be asking for the White pieces here!]
25.f5
exf5
It is either this capture allowing a White Knight to f5 or giving White the chance to crate a huge wedge with f6. The sortie Bg5 either here or on the next move seems to concede White extra options based on the exposed Bishop rather than give Black enhanced defensive options.
26.Nxf5
Ne6
It is a measure of the seriousness of Black's position that this impressive-looking move isn't actually that good. Yes, it defends g7 and prevents e5-e6 by White, but that's it. The Knight's control of g5, f4, d4 or c5 isn't particularly relevant as White isn't really interested in most of these squares. By contrast the steed on f5 definitely has designs on h6, g7, e7 and d6, and is now joined by its partner who exploits the pin on the d-file.
27.Ne4
d4
A desperate attempt to deflect White from his attack by offering a Pawn that was merely blocking his Bishop anyway. The Pawn isn't going anywhere so I decided to continue building on the Kingside. The next move is obvious but it felt really good to bring my Queen to bear so directly on a GM's King.
28.Qg4
Bxe4
Still refusing to move Kingside Pawns [28...g6
may have been better.; 28...Rfd8
29.Rxd4+-
Crushes White 29...Qc7
(29...Nxd4
30.Qxg7#
; 29...Nd5
30.c4+-
) 30.Nh6+
Kh8
31.Nxf7+
Kg8
32.Qxe6+-
]
29.Bxe4
30 Nxg7 is a clear threat because Black's Queen is no longer defended so the Ne6 is pinned. Black undergoes further contortions with his Queen to avoid this because 28... Rfd8 was met by 29 Rxd4 which is crushing.
29...Qe8
30.Rxd4
I chose this move because I felt it gave me the most options and it clears the last Black unit out of the path of my Bishop on b2. 30 Nxd4 and Rdf2 are also okay. White now threatens to win much material with 31 Nxe7+ Qxe7; 32 Rxb4 Qxb4; 33 Bxh7+ and 34 Qxb4. [30.Rdf2
; 30.Nxd4
]
30...Nxc2
31.Rd2!
Restraint is White's watchword. Black was now seriously short of time having only a handful of minutes to reach move 48. I had about 40 minutes and put them to some good use here. [31.Nxe7+ Qxe7 32.Bxh7+ Kxh7 33.Qh5+ Kg8 34.Rh4 with a mating attack.
My first analysis ran 34...Qb7+ (34...Qxh4 White has given up his great Knight, Bishop and Rook to win Black's miserable Queen and Bishop, and now Black has reason to play on. My computer confirms the game continuation is a bigger plus for White than this variation. ) 35.Kg1 Qa7+ 36.Kg2? (36.Rf2+- and Black must move his f Pawn to avoid mate. 36...f6 37.exf6 threatening 37 f7+ and 38 Qh7 or h8 mate. (37.Qh7+ Kf7 38.exf6 ) ) 36...Ne3+ 37.Kh3 Ng5+! 38.Qxg5 Nxf1 39.Qh5 Qd7+-+ Okay, there's an easy improvement with 36 Rf2 However the reason why I chose not to play this line was the counter sacrifice 34...Qxh4.]
After the regrouping in the game White has every single one of his pieces aimed at the Black King. This seemed to be a much better option, and I was right! In contrast Black has two pieces completely out of play on the Queenside, of which the Knight is tactically vulnerable, while the rest of Black's army huddle together hoping to survive the coming storm by sheer proximity. However, White's army consists of some very effective long-range units, as we shall soon see.
31...Nb4
32.Rdf2
Ng5?
Black cracks under the intolerable strain of position and clock. [The obvious line was 32...Kh8
33.Nd6
Bxd6
34.exd6
is really good for White. One threat is 35 Rf6! followed by either 36 Rxe6 and mate on g7 or 36 Rh6 breaking through on h7. Another is a combination of d7 and Bxg7+, but a really simple play is 35 Qf5 threatening mate on h7. ]
33.Nxg7
Qb5
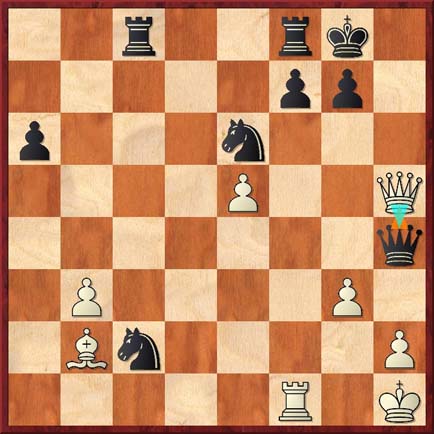
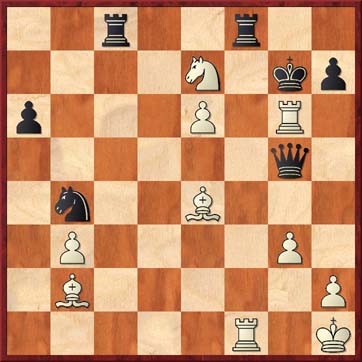
34.Nf5
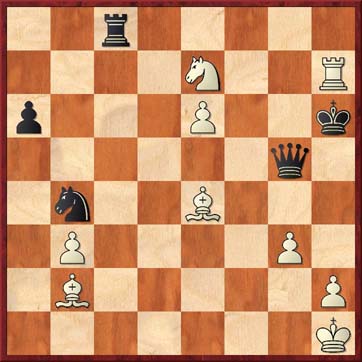
1-0
( Final Position )
The simplest. At the very least White is winning a piece after 34... Qe8; 35 Nxe7+ Qxe7; 36 h4. By now I was far more interested in my opponent’s digital clock that showed less than twenty seconds. When it showed just four seconds, my opponent resigned. I still had twenty-six minutes left
Some interesting finishes are possible here based on the
pawn push e6 leading to forced mates.
(Dave Tipper)
34...Qe8
35.e6
is a forced mate in 7 [35.Nxe7+
Qxe7
36.h4
wins a piece]
35...f6
[35...Rc3
36.Bxc3
f6
37.Qxg5+
Qg6
38.Nxe7+
Kg7
39.Rxf6
Rxf6
40.Rxf6
Qxg5
41.Rf7+
Kh6
42.Rxh7#
is the mate in 7 delaying f6 by playing Rc3 first]
36.Qxg5+
Qg6
[36...fxg5
37.Nh6#
]
37.Nxe7+
Kg7
38.Rxf6
leads to some interesting mate positions!
38...Rxf6
[38...Qxg5
39.Rg6#!!
]
39.Rxf6
Qxg5
40.Rf7+
Kh6
41.Rxh7#